Game design
- Room
- Box
- Ball
- Gun
- Box Generator
- Wall
- Score
- GUI Skin
- Time Limitation
- Result Scene
- Start Scene
- Title Scene
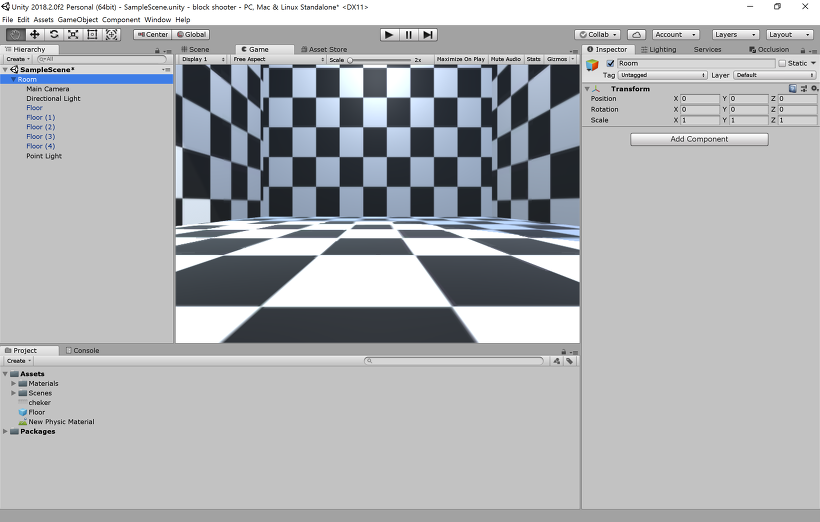
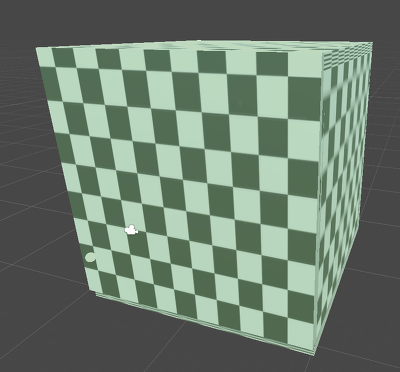
Create room
- Create floor, wall and ceiling
- Create Cube and change Name to
Floor - Create three walls and change Name to
Wall1,Wall2andWall3 - Create Cube and change Name to
Ceiling - Add checker texture
- Decrease Static Friction and Dynamic Friction and increase Bounciness

Block Shooter Room - Create Cube and change Name to
- Deploy light
- Create Point Light and change Position to (0, 15, 0)
- Change Range to 25 and Intensity to 2.0 in Light Component

Block Shooter Room - Build hierarchy structure
- Create Empty Game Object and change Position to (0, 0, 0)
- Input all elements
Block Shooter Room - Save Scene
- build Settings>Scenes In Build
- Create Main Scene
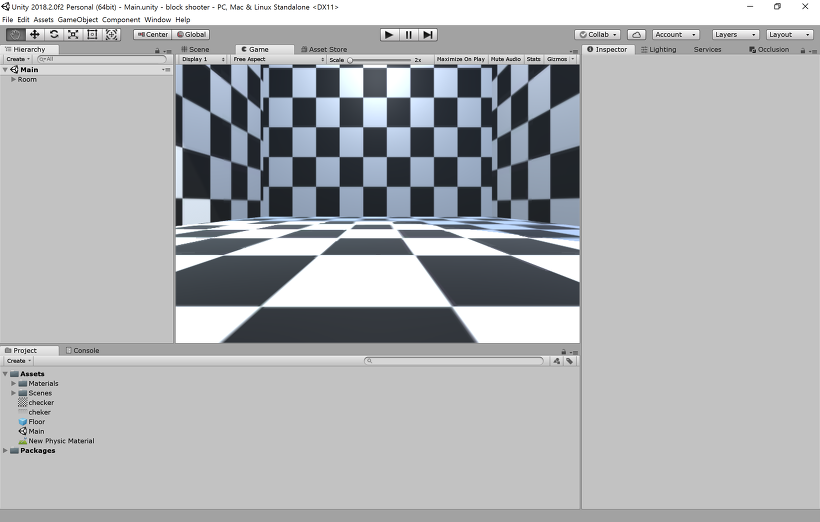
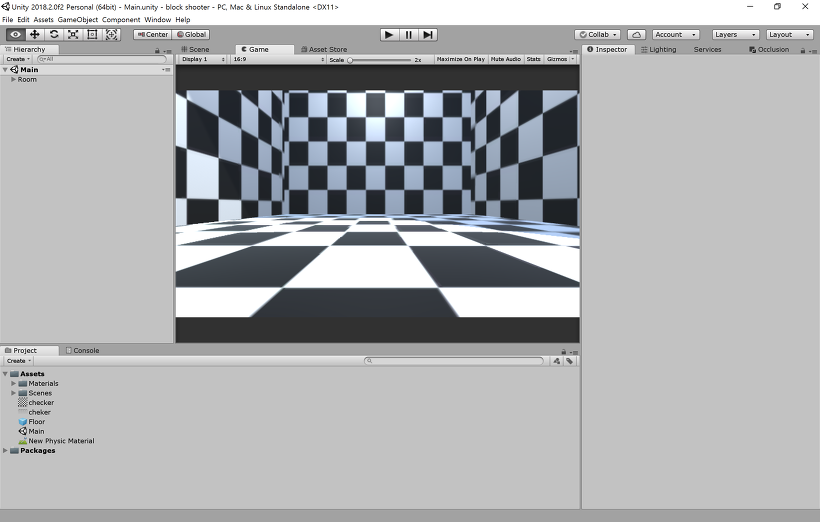
Block Shooter Room - Deploy Camera
- Set Aspect Ratio to 16:9 in Game View
- Change Angle of Camera to 75

Block Shooter Room
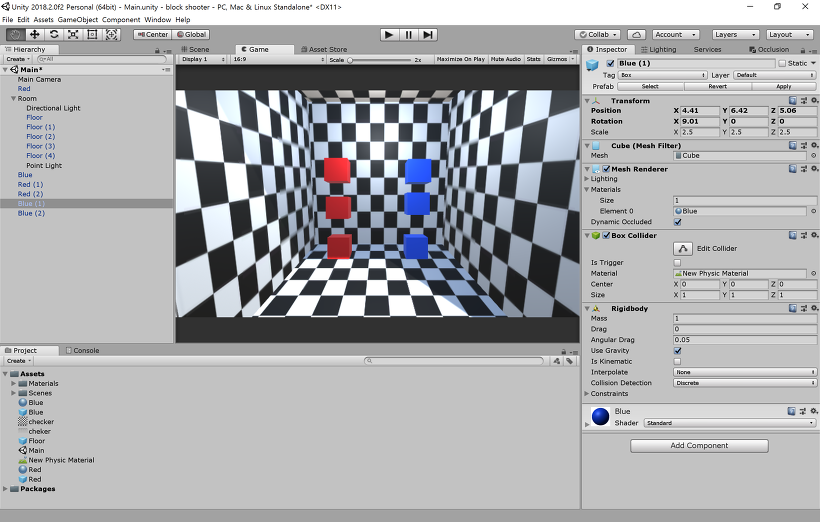
Create box
- Create box
- Create Cube and change Scale to 2.5
- Add Rigidbody Component
- Add Physical Material and Tag Box
- Copy the
Box - Change Name each boxes to
Red BoxandBlue Box - Create Material for each boxes
- Prefab each boxes
- Drag and drop Prefabs to each boxes

Block Shooter Box
</figure>
Create Gun
- Create bullet Prepeb
- Create Sphere and change Scale to 0.5
- Add
RigidbodyComponent - Set Shader to Self-Illumin>diffuse
- Prefab and change Name to
Bullet
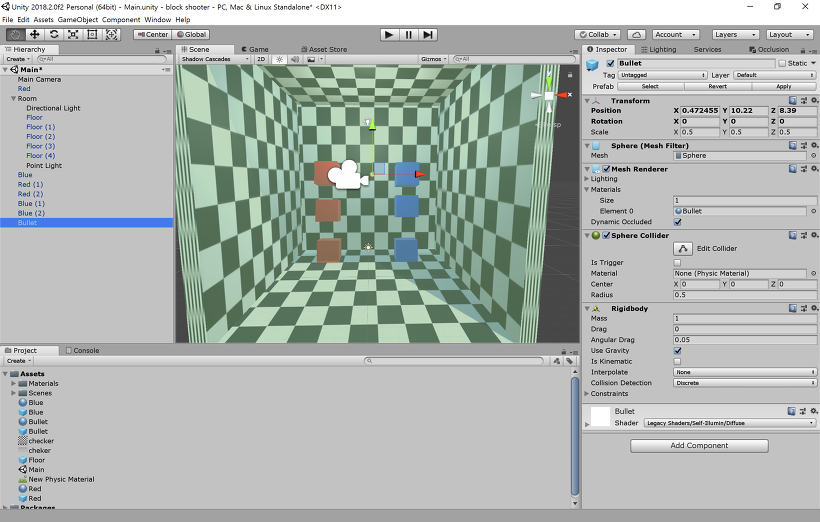
Block Shooter Gun Gun.js
    var bulletPrefab : GameObject;
    var initialVelocity : float;

    function Update(){
      if(Input.GetButtonDown("Fire1")){
        var bullet : GameObject = Instantiate(bulletPrefab, transform.position, transform.rotation);
        var direction : Vector3 = transform.forward;
        bullet.rigidbody.velocity = direction * initialVelocity;
      }
    }
- Drag and drop to
Main Camera - Drag and drop
BulletPrefab tobulletPrefabin Inspector View - Change
initialVelocityto 50
-
Gun.js(change)
    var bulletPrefab : GameObject;
    var initialVelocity : float;

    function Update(){
      if(Input.GetButtonDown("Fire1")){
        var bullet : GameObject = Instantiate(bulletPrefab, transform.position, transform.rotation);
        //here
        var screenPoint = Input.mousePosition;
        screenPoint.z = 10.0;
        var worldPoint = camera.ScreenToWorldPoint(screenPoint);
        var direction = (worldPoint - transform.position).normalized;
        //
        bullet.rigidbody.velocity = direction * initialVelocity;
      }
    }
Bullet.js
    function OnCollisionEnter(collisionInfo : Collision){
      if(collisionInfo.gameObject.tag == "BOX"){
        Destroy(collisionInfo.gameObject);
      }
      Destroy(gameObject);
    }
-
Drag and drop to
BulletPrefab -
Introduce messaging
-
Bullet.js(change)
-
    function OnCollisionEnter(collisionInfo : Collision){
      if(collisionInfo.gameObject.tag == "BOX"){
        collisionInfo.gameObject.SendMessage("ApplyDamage");
      }
      Destroy(gameObject);
    }
Box.js
    function ApplyDamage(){
      Destroy(gameObject);
    }
-
Drag and drop
Box.jstoRed BoxPrefab andBlue BoxPrefab -
Improve visual presentation
- Create Empty Game Object
- Component>Effects>Legacy Particles
- Select
Ellipsoid Particle Emitter,Particle AnimatorandParticle Render
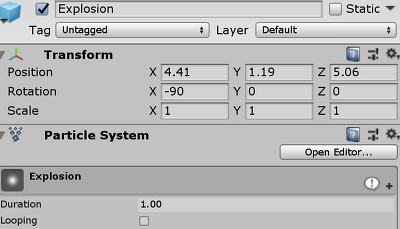
Block Shooter Gun - Set
Ellipsoid Particle Emitter
Min Size: 3
Max Size: 5
Min Energy and Max Energy: 0.5
Min Emission and Max Emission: 30
X, Y and Z of Rnd Velocity: 25
Rnd Angular Velocity: 360
Rnd Rotation: On
One Shot: On
- Set Particle Animator
Damping: 0.01
Autodestruct: On - Create
ExplosionPrefab and drag and drop this particle effect -
Box.js(change)
      function ApplyDamage(){
        Instantiate(explosionPrefab, transform.position, transform.rotation);
        Destroy(gameObject);
      }
-
Drag and drop
ExplosionPrefab toexplosionPrefabin Inspector View -
Improve to delay of destroy
-
Box.js(change)
-
      var explosionPrefab : GameObject;
      private var damaged : boolean;
      private var killTimer : float;

      function ApplyDamage(){
        if (!damaged){
          damaged = true;
          killTimer = 0.4;
        }
      }

      function Update(){
        if (!damaged) return;
        killTimer -= Time.deltaTime;
        if(killTimer <= 0.0){
          Instantiate(explosionPrefab, transform.position, transform.rotation);
          Destroy(gameObject);
        }
      }
-
Box.js(change)
      function ApplyDamage(){
        if (!damaged){
          damaged = true;
          killTimer = 0.4;
          //here
          rigidbody.AddForce(Vector3.up * 15.0, ForceMode.Impulse);
          //
        }
      }
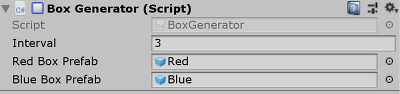
Create Box Generator
-
Create Empty Game Object and change Name to
Box Generator -
BoxGenerator.js
      var interval : float;
      var redBoxPrefab : GameObject;
      var blueBoxPrefab : GameObject;

      private var nextIsRed : boolean;
      private var timer : float;

      function Start(){
        nextIsRed = true;
        timer = 0.0;
      }

      function Update(){
        timer -= Time.deltaTime;
        if (timer < 0.0){
          var prefab : Gameobject = nextIsRed ? redBoxPrefab : blueBoxPrefab;
          Instantiate(prefab, transform.position, transform.rotation);
          timer = interval;
          nextIsRed= !nextIsRed;
        }
      }
- Drag and drop
BoxGenerator.jstoBox GeneratorGame Object - Change
Intervalto 0.5 and drag and drop each Prefabs toRed Box PrefabandBlue Box Prefabin Inspector View -
BoxGenerator.js(change)
      function Update(){
        timer -= Time.deltaTime;
        if (timer < 0.0){
          // here
          var offsx : float = Random.Range(-8.0, 8.0);
          var offsz : float = Random.Range(-4.0, 4.0);
          var position : Vector3 = transform.position + Vector3(offsx, 0, offsx);
          //
          var prefab : Gameobject = nextIsRed ? redBoxPrefab : blueBoxPrefab;
          // here
          Instantiate(prefab, position, Random.rotation);
          //
          timer = interval;
          nextIsRed= !nextIsRed;
        }
      }
Create unvisible wall
- Create univisible wall with normal wall
- Duplicate
wall - Locate to front of
room
Block Shooter Unvisible Wall - Delete
RendererComponent

Block Shooter Unvisible Wall - Duplicate
- Introduce Layer and Collision filtering
- Edit>Project Setting>Tags
- Open
Tag Managerin Inspector View - Set
BulletinUser Layer 8andFenceinUser Layer 9

Block Shooter Unvisible Wall - Click
BulletPrefab in Project View - Change
LayertoBulletin Inspector View - Click unvisible wall Game Object
- Change
LayertoFence

Block Shooter Unvisible Wall - Edit>Project Settings>Physics
- Open
Physics Managerin Inspector View - Open
Layer Collision Matrix - Uncheck where is crossing
BulletandFence
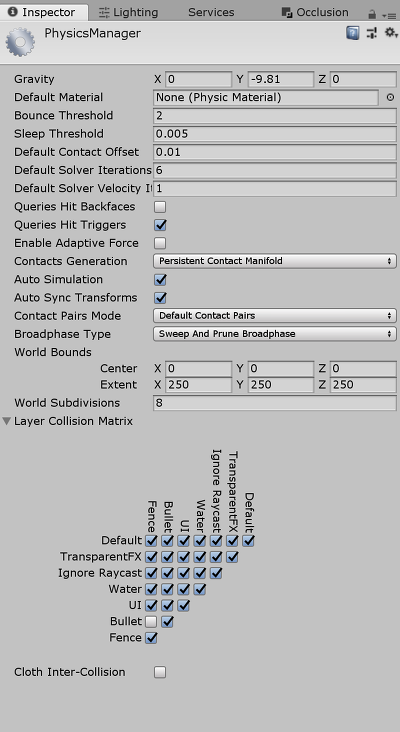
Block Shooter Unvisible Wall
Count score
- Structure
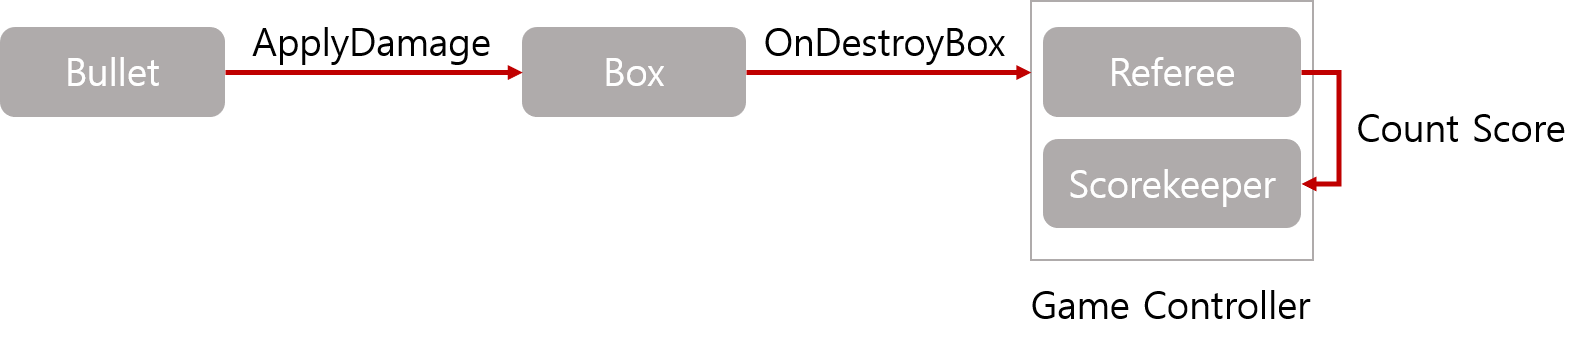
Block Shooter Score -
Scorekeeper.js: Manage score by number
    @HideInInspector
    var score : int;
    function OnGUI(){
      var sw : int = Screen.width;
      var sh : int = Screen.height;
      var scoreText : String = "SCORE: " + score.ToString();
      GUI.Label(Rect(0, 0, sw/2, sh/4), scoreText);
    }
-
Referee.js: Process to manage rule and change target
    @script RequireComponent(Scorekeeper)
    var switchInterval : int;
    var rewardPoint : int;
    var penaltyPoint : int;

    private var scorekeeper : Scorekeeper;
    private var targetIsRed : boolean;
    private var switchTimer : float;

    private function GetRatgetColorName() : String{
      return targetIsRed ? "Red" : "Blue";
    }

    function Start(){
      scorekeeper = GetComponent(Scorekeeper) as Scorekeeper;
      targetIsRed = true;
      switchTimer = switchInterval;
    }

    function Update(){
      switchTimer -= Time.deltaTime;
      if(switchTimer < 0.0){
        targetIsRed = !targetIsRed;
        switchTimer = switchInterval;
      }
    }

    function OnDestroyBox(boxColorName : String){
      If (boxColorName == GetTargetColorName()){
        scorekeeper.score += rewardPoint;
      } else {
        scorekeeper.score -= penaltyPoint;
      }
    }

    function OnGUI(){
      If (switchTimer < 1.5) return;
      var sw : int = Screen.width;
      var sh : int = Screen.height;
      var message : String "Shoot" + GetTargetColorName() + " Boxes";
      GUI.color = targetIsRed ? Color.red : Color.blue;
      GUI.Label(Rect(0, sh/4, sw, sh/2), message);
    }
-
Box.js(change): Save which box is desproyed
- Add this code first line
var colorName : String;
- Change
Update()
    function Update(){
      if (!damaged) return;
      killTimer -= Time.deltaTime;
      if(killTimer <= 0.0){
        // here
        var gameController : GameObject = GameObject.FindWithTag("GameController");
        gameController.SendMessage("OnDestroyBox", colorName);
        //
        Instantiate(explosionPrefab, transform.position, transform.rotation);
        Destroy(gameObject);
      }
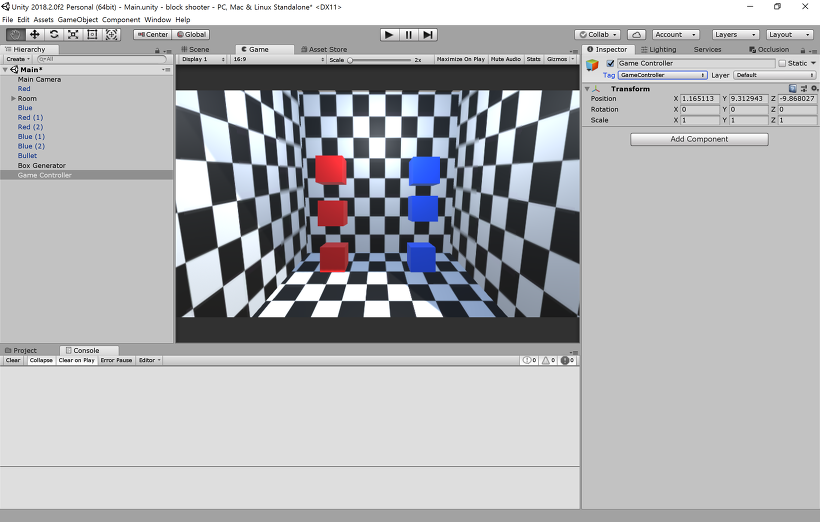
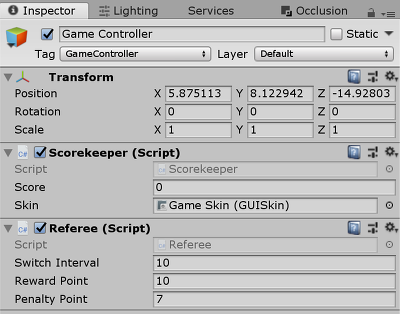
- Create
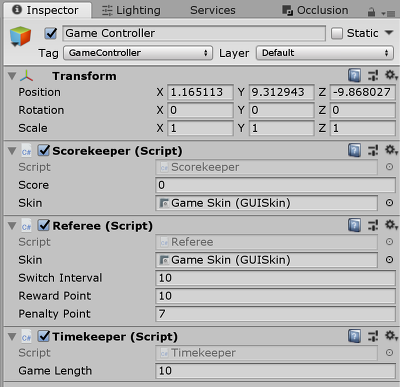
Game ControllerGame Object- Create Empty Game Object and change Name to
Game Controller - Select
Game ControllerinTagpull down menu in top of Inspector View
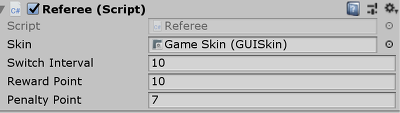
Block Shooter Score - Add
Referee.js - change
Reward Pointto 10 andPenalty Pointto 7
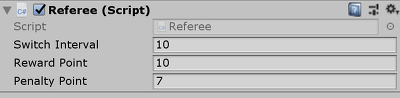
Block Shooter Score - Put
Box Generatorunder theGame controller

Block Shooter Score - Select
Red BoxPrefab in Project View and inputRedinColor nameofBoxScript Component in Inspector View - Same in
Blue Box


Block Shooter Score - Create Empty Game Object and change Name to
Set GUI skin
- Create GUI skin
- Create>GUI Skin
- Change Name to
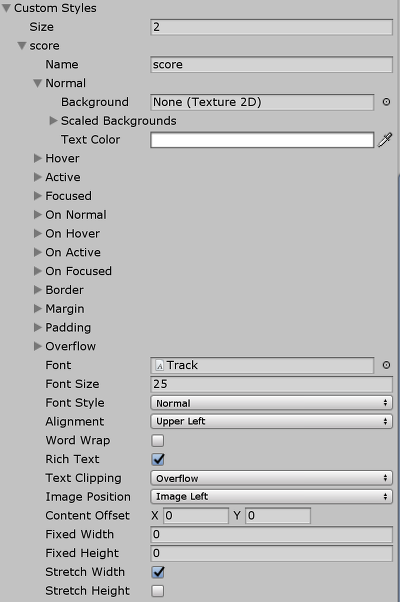
Game Skin - Open Custom Styles
- Change Size to 2
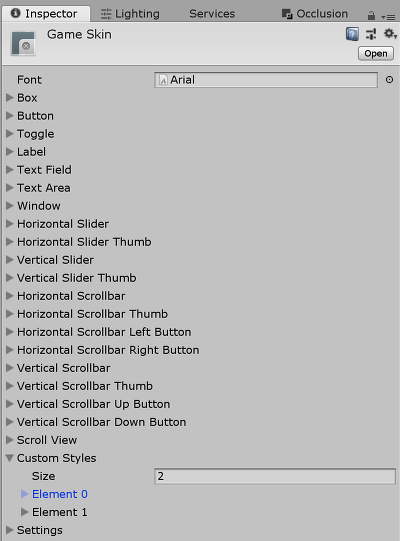
Block Shooter GUI - Open Element 0 and change Name to
score - Open Normal and change Text Color to white
- Change Font
- Change Font Size to 25
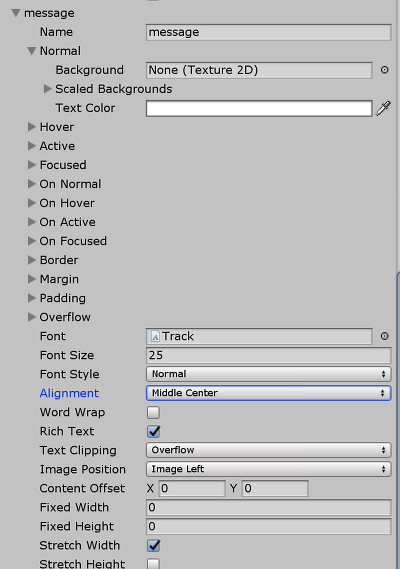
Block Shooter GUI - Open Element 1 and change Name to
message - Change Alignment to Middle Center
- And same with
score
- Apply GUI skin
-
Scorekeeper.js(change)
Add code in first line
-
var skin : GUISkin;
Add code in first line of OnGUI function
GUI.skin = skin;
Change GUI.Label function
GUI.Label(Rect(0, 0, sw/2, sh/4), scoreText, "score");
- Drag and drop
Game SkintoSkininScoorekeeperScript Component
-
Referee.js(change)
Add code in first line
var skin : GUISkin;
Add code in first line of OnGUI function
GUI.skin = skin;
Change GUI.Label function
GUI.Label(Rect(0, 0, sw/2, sh/4), scoreText, "message");
- Drag and drop
Game SkintoSkininRefereeScript Component
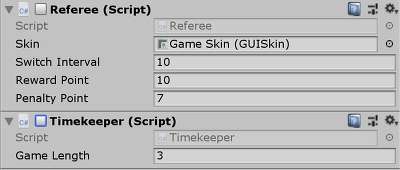
Set time limitation
-
Timekeeper.js- Add
Game ControllerGame Object
- Add
    var gameLength : float;

    private var elapsed : float;

    function Update(){
      elapsed += Time.deltaTime;
      if(elapsed >= gameLength){
        BroadcastMessage("TimeUp");
        GameObject.FindWithTag("MainCamera").SendMessage("TimeUp");
        enabled = false;
      }
    }
- Set
Game LengthinTimekeeperScript Component
- Add “TimeUp” message processing
-
Gun.js(change),Referee.js(change) andBox Generator.js(change)
Add this code in last line
-
    function TimeUp(){
      enabled = false;
    }
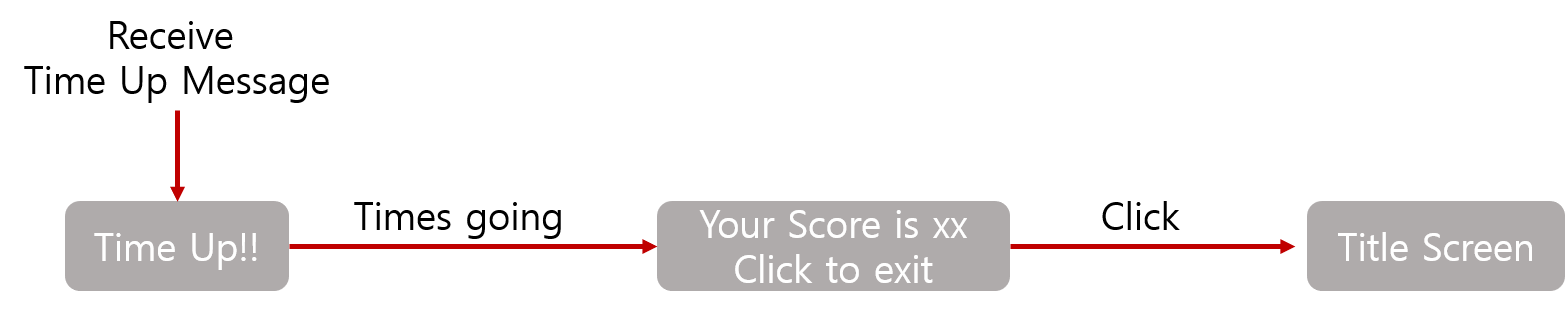
Create result scene
-
ReulstScreen.js- Add
Game ControllerGame Object - Structure
Block Shooter Result Scene - Add
    @script RequireComponent(Scorekeeper)

    var skin : GUISkin;

    private var scorekeeper : Scorekeeper;
    private var state : String;

    function Start(){
      scorekeeper = GetComponenet(Scorekeeper) as Scorekeeper;
    }

    function TimeUp(){
      state = "Time Up";
      yield WaitForSeconds(3.0);
      state = "";
      yield WaitForSeconds(0.5);
      state = "Show Score";
      while (!Input.GetButtonDown("Fire1")) yield;
      Application.LoadLevel("Main");
    }

    function OnGUI(){
      var sw : int = Screen.width;
      var sh : int = Screen.height;
      GUI.skin = skin;
      If (state == "Time Up"){
        GUI.Label(Rect(0, 0, sw, sh), "Time Up!!", "message");
      }
      else if (state == "Show Score"){
        var scoreText : String = "Your score is " + scorekeeper.score.ToString();
        GUI.Label(Rect(0, sh/4, sw, sh/4), scoreText, "message");
        GUI.Label(Rect(0, sh/2, sw, sh/4), "Click to Exit", "message");
      }
    }
- Drag and drop
Game SkininskininResultScreenScript
Create start scene
-
GameStarter.js- Add
Game ControllerObject
- Add
    var skin : GUISkin;

    private var timer : float;

    function Start(){
      timer = 3.5;
    }

    function Update(){
      timer -= Time.deltaTime;
      if(timer <= 0.0){
        BroadcastMessage("StartGame");
        enabled = false;
      }
    }

    function OnGUI(){
      If (timer > 3.0 || timer <= 0.0) return;

      var sw : int = Screen.width;
      var sh : int = Screen.height;
      var text : String = Mathf.CeilToInt(timer).ToString();
      GUI.skin = skin;
      GUI.color = Color(1, 1, 1, timer - Mathf.FloorToInt(timer));
      GUI.Label(Rect(0, sh/4, sw, sh/2), text, "message");
    }
- Create
StartGamemessage processing-
Referee.js(change),Timekeeper.js(change) andBoxGenerator.js(change)
Add this code in last line
-
    function StartGame(){
      enabled = true;
    }
- Set GUI and check action
- Drag and drop
Game SkininskininGameStarterScript - Uncheck
Referee.js,Timekeeper.jsandBoxGenerator.jsin Inspector View
Block Shooter Start Scene - Drag and drop
Create Title Scene
- Create
TitleScene- Save
MainScene first - File>Save Scene as
- Save Name to
Title - Add
Titleby pressAdd Currentto add inScene In Build - Put
Titlein the top

Block Shooter Title Scene - Delete
Game ControllerGame Object - Delete
Gun.jsinMain CameraGame Object
- Save
TitleScreen.js
  var skin : GUISkin;

  function Update(){
    if (Input.GetButtonDown("Fire1")){
      Application.LoadLevel("Main");
    }
  }

  function OnGUI(){
    var sw : int = Screen.width;
    var sh : int = Screen.height;
    GUI.skin = skin;
    GUI.Label(Rect(0, 0, sw, sh), "B L O C K S H O O T E R", "message");
    GUI.Label(Rect(0, sh/2, sw, sh/2), "Click to Start", "message");
}- Create Empty Game Object
- Change Name to
Title - Add
Title.jsand change skin toGame Skin -
ResultScreen.js(change)
    //here
    Application.LoadLevel("Title");
    //